

Designing the Glue between Server and Client
Documenting APIs with Insomnia and Redoc using OpenAPI 3.0.4


When working on a project for three months and then abandoning it, documentation is a bit of a pain. But for anything more than that, documenting the software structure is important, especially when working in a team or when planning to work in a team someday. Even when working alone I don’t remember what I thought six months ago, which functions should be deleted and out commented code can be removed.
While I have written about documenting actual code with swimm.io in a recent post, now I will go into looking at a micro service from a networking perspective by designing and testing Application Programmable Interfaces or APIs. Actually the world today is run using APIs.
Writing software documentation I often do after the code is written, but for deciding how an API call should behave and which routes should exist, it makes sense to design an API first before writing any code. There are different conventions how an API should look like, e.g. OpenAPI, and then a file syntax like YAML (maybe JSON or XML would be possible as well) that describes how to specify an API according to OpenAPI standard. Then there are RESTful naming conventions for the URL routes. I know, but it sounds more complicated than those fancy abbreviations make it seem. Learning those conventions and standards enables you to harness the experience and mistakes of decades of development without having to reinvent the wheel.
While OpenAPI version 3.1.0 is released, the tool Insomnia, which helps us write a OpenAPI specification in YAML, does only support version 3.0.4, so we have to stay with that for now. The new version makes working with files in POST request a little bit easier.
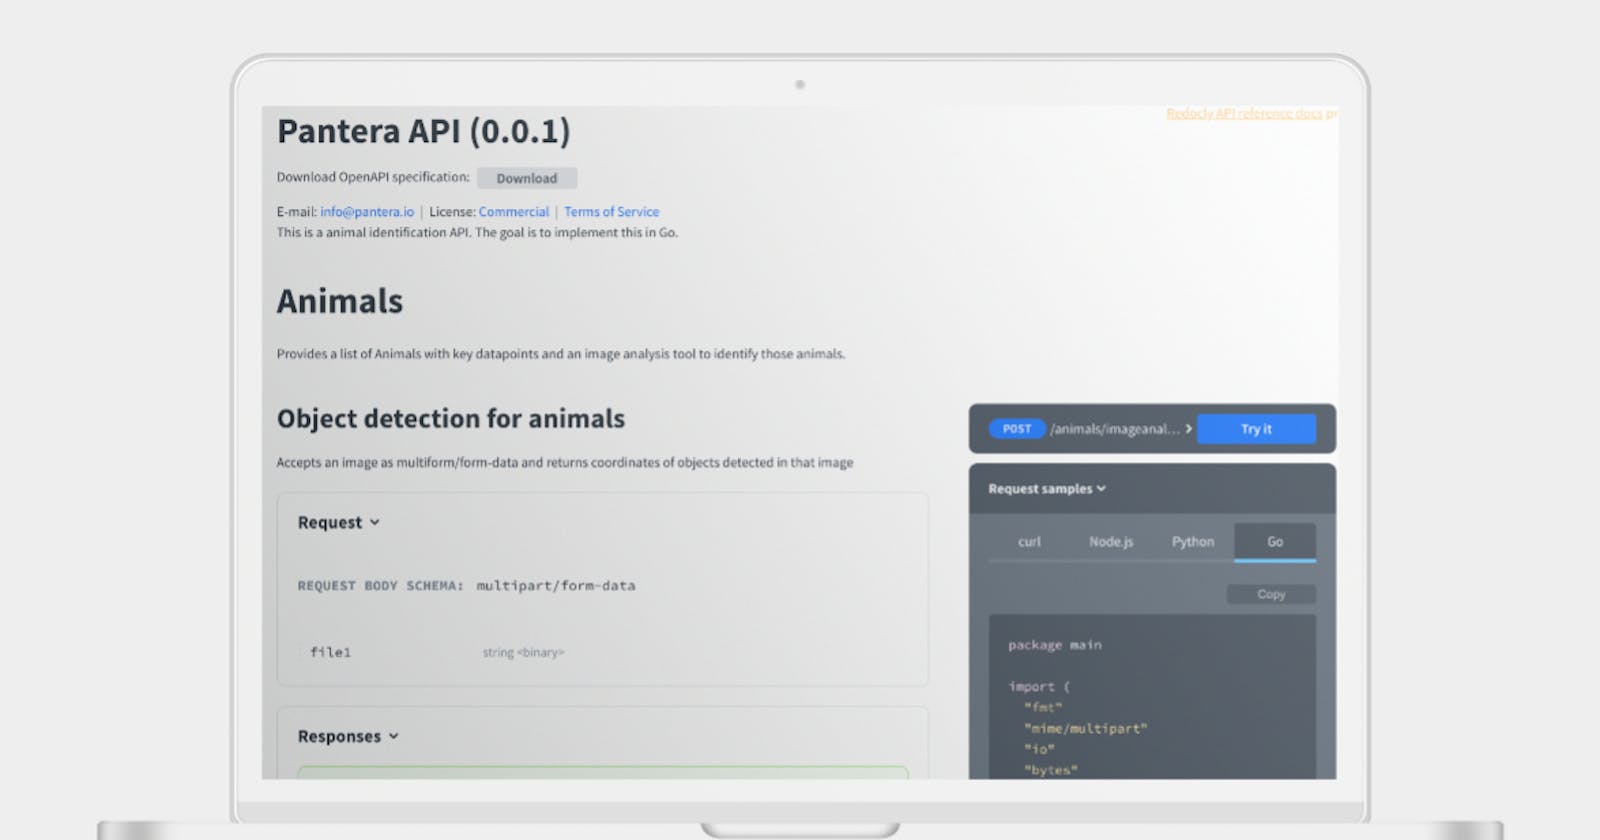
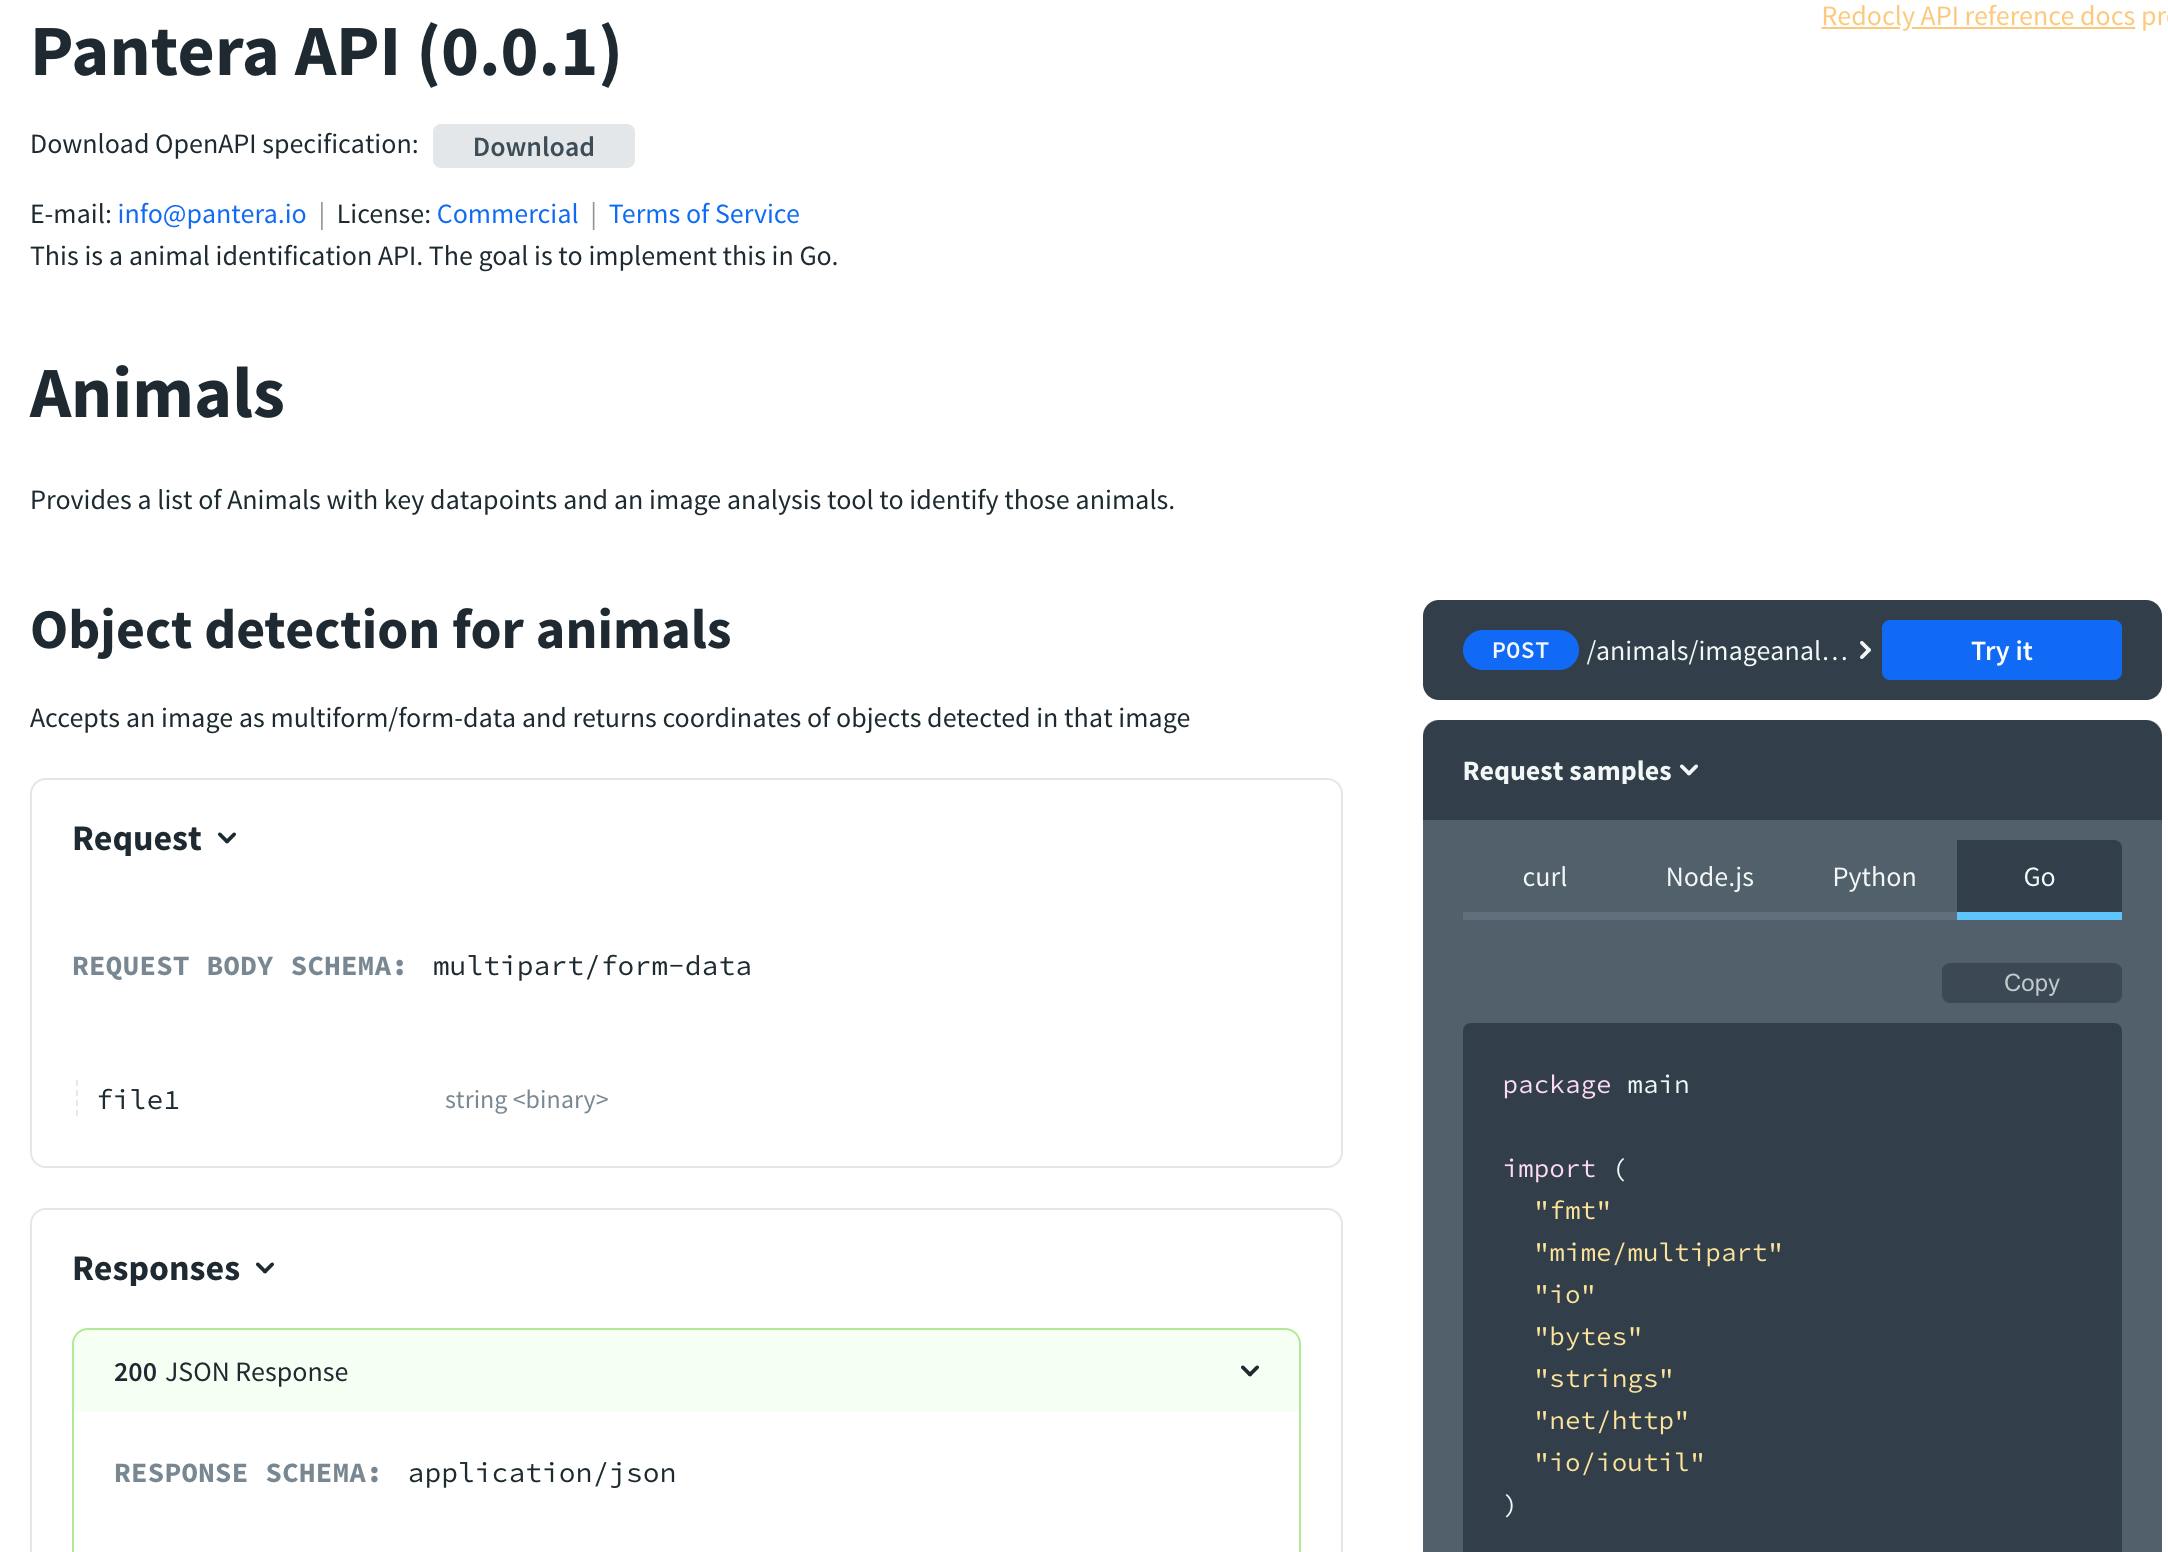
At the end of this post we will have written a long list as YAML file from which we can generate a website that will be our documentation with redoc. Think of it as a communication tool between front- and backend developers (which both can be yourself). Using the tool Insomnia (alternative to Postman) gives a live preview of this documentation website and later we can test the actual API with it. This is more convenient than just using VSCode.
So first let’s download and create a new API in Insomnia or if you decide for another way create an api.yml file and insert the following line (without the ...).
openapi: 3.0.4
...
The current version of OpenAPI is 3.1.0. Insomnia unfortunately doesn’t support that, that results in some inconvenient syntax when uploading files as POST request, so we are going with 3.0.4.
Next we are extending the document step by step until we developed a full API definition.
- Set general information
- Set API server URL
- Define routes for HTTP requests
- Add Parameters and Send Files
- Define expected responses
- Define a schema for an object
- Publish the documentation with Redoc
- Bonus: Dealing with CORS Error in Go Echo
- Conclusion
Set general information
So let’s start with adding general information.
...
info:
  title: Pantera API
  description: "This is a animal identification API. The goal is to implement this in Go."
  version: 0.0.1
  termsOfService: http://swagger.io/terms/
  contact:
    email: info@pantera.io
  license:
    name: Commercial
    url: http://localhost
...
title is a self assigned name of the API.
description should describe the purpose of the API, well duh, obviously. But don’t take this lightly. Before writing a single line of code it makes you think and clearly state your intentions. This serves as a guide which functions the API should provide and maybe even more important which functions it should not provide, because they are part of a different service. Doesn’t have to be perfect starting out though, it evolves over time.
Version serves to denote the Version of your API. The first digit 1.x.x usually indicates major changes, that can be incompatible with earlier versions. Often functions are set deprecated when updating to one major release and then phased of with the release after that.
The termsOfService link to a legal document that provides terms under which the API can be used. You might want to restrict use of an API only to your company or limit commercial use or enforce rate limits, actually I am not sure if this is done in the terms, but in any case rate limits should also be enforced in the server code.
contact allows to provide an email or other contact information to the person responsible for the API.
license let’s you choose a license like CreativeCommons, MIT.... and link to the terms with a url.
...
externalDocs:
  description: Find out more about Swagger
  url: http://swagger.io
...
...
tags:
  - name: Animals
    description: Provides a list of Animals with key datapoints and an image analysis tool to identify those animals.
  - name: Zoos
    description: Returns a list of Zoos
...
Set API server URL
Next we set the server base URL. In the beginning this can be you own computer and later it will be your domain pantera.io. You can define multiple URLs as well, one for production, one for testing. Now, I have set a version v1, but it might be better to set it in an Accept-Version header.
...
servers:
  - url: http://127.0.0.1:1324/api/v1
...
This was the warmup. Next we will define our actual API paths and how the possible requests (think GET, POST, PUT) as well as responses looks like.
Define routes for HTTP requests
/animals/imageanalysis
Our first path is lets say /animals/imageanalysis
...
paths:
    /animals/imageanalysis:
        post:
...
Then we add a tag under which this path should be categorised like animals, which we have defined earlier, but you can set new tags, they just won’t have any description then.
...
       tags:
       - Animals
...
The route has it’s own summary and description. There is also a optional field operationId which has to be unique and refers to the function name in server code that handles that route.
...
       summary: "Object detection for animals"
       description: "Accepts an image as multiform/form-data and returns coordinates of objects detected in that image"
       operationId: parseImageAnalysisResponse
...
and maybe let’s add another tag for information about zoos.
...
    - name: Zoos
        description: Manage a list of Zoos
...
Add Parameters and Send Files
This is now the interesting part, a form with a file to upload. There is a simpler way, which is just uploading one file or image. We go for a way to upload multiple files and parameters using multiparty/form-data. It is an object with multiple properties, let’s call the first file1. Although we talk about an image, it is still of type string and has format binary. Then we set the encoding of the field file1 as contentType: image/png, image/jpeg. I think about this as a snippet that I can copy and paste.
    ...
    requestBody:
        content:
          multipart/form-data:
            schema:
              type: object
              properties:
                file1:
                  type: string
                  format: binary
            encoding:
              file1:
                contentType: image/png, image/jpeg`
    ...
This works so far, but for further reading you can look into format: base64and the general Content-Type: application/octet-stream.
If we could work with OpenAPI 3.1.0, then it will look a little clearer.
# OpenAPI v3.1
requestBody:
  content:
    multipart/form-data:
      schema:
       type: object
       properties:
        orderId:
          type: integer
        fileName:
          type: string
          contentMediaType: application/octet-stream
Now after discussing how a request looks like, let’s move forward to HTTP responses.
Define expected responses
The most famous HTTP response code will probably be 404 - not found. This isn’t the most common one, since most of the time the internet works, we get 200 - success. Those codes are grouped 1xx, 2xx, 3xx, 4xx or 5xx and a list of available HTTP responses can be found here on Wikipedia.
...
responses:
        "405":
          description: Invalid input
        "200":
           description: JSON Response
           content:
             application/json:
              schema:
                  $ref: "#/components/schemas/AnimalAnalysis"
...
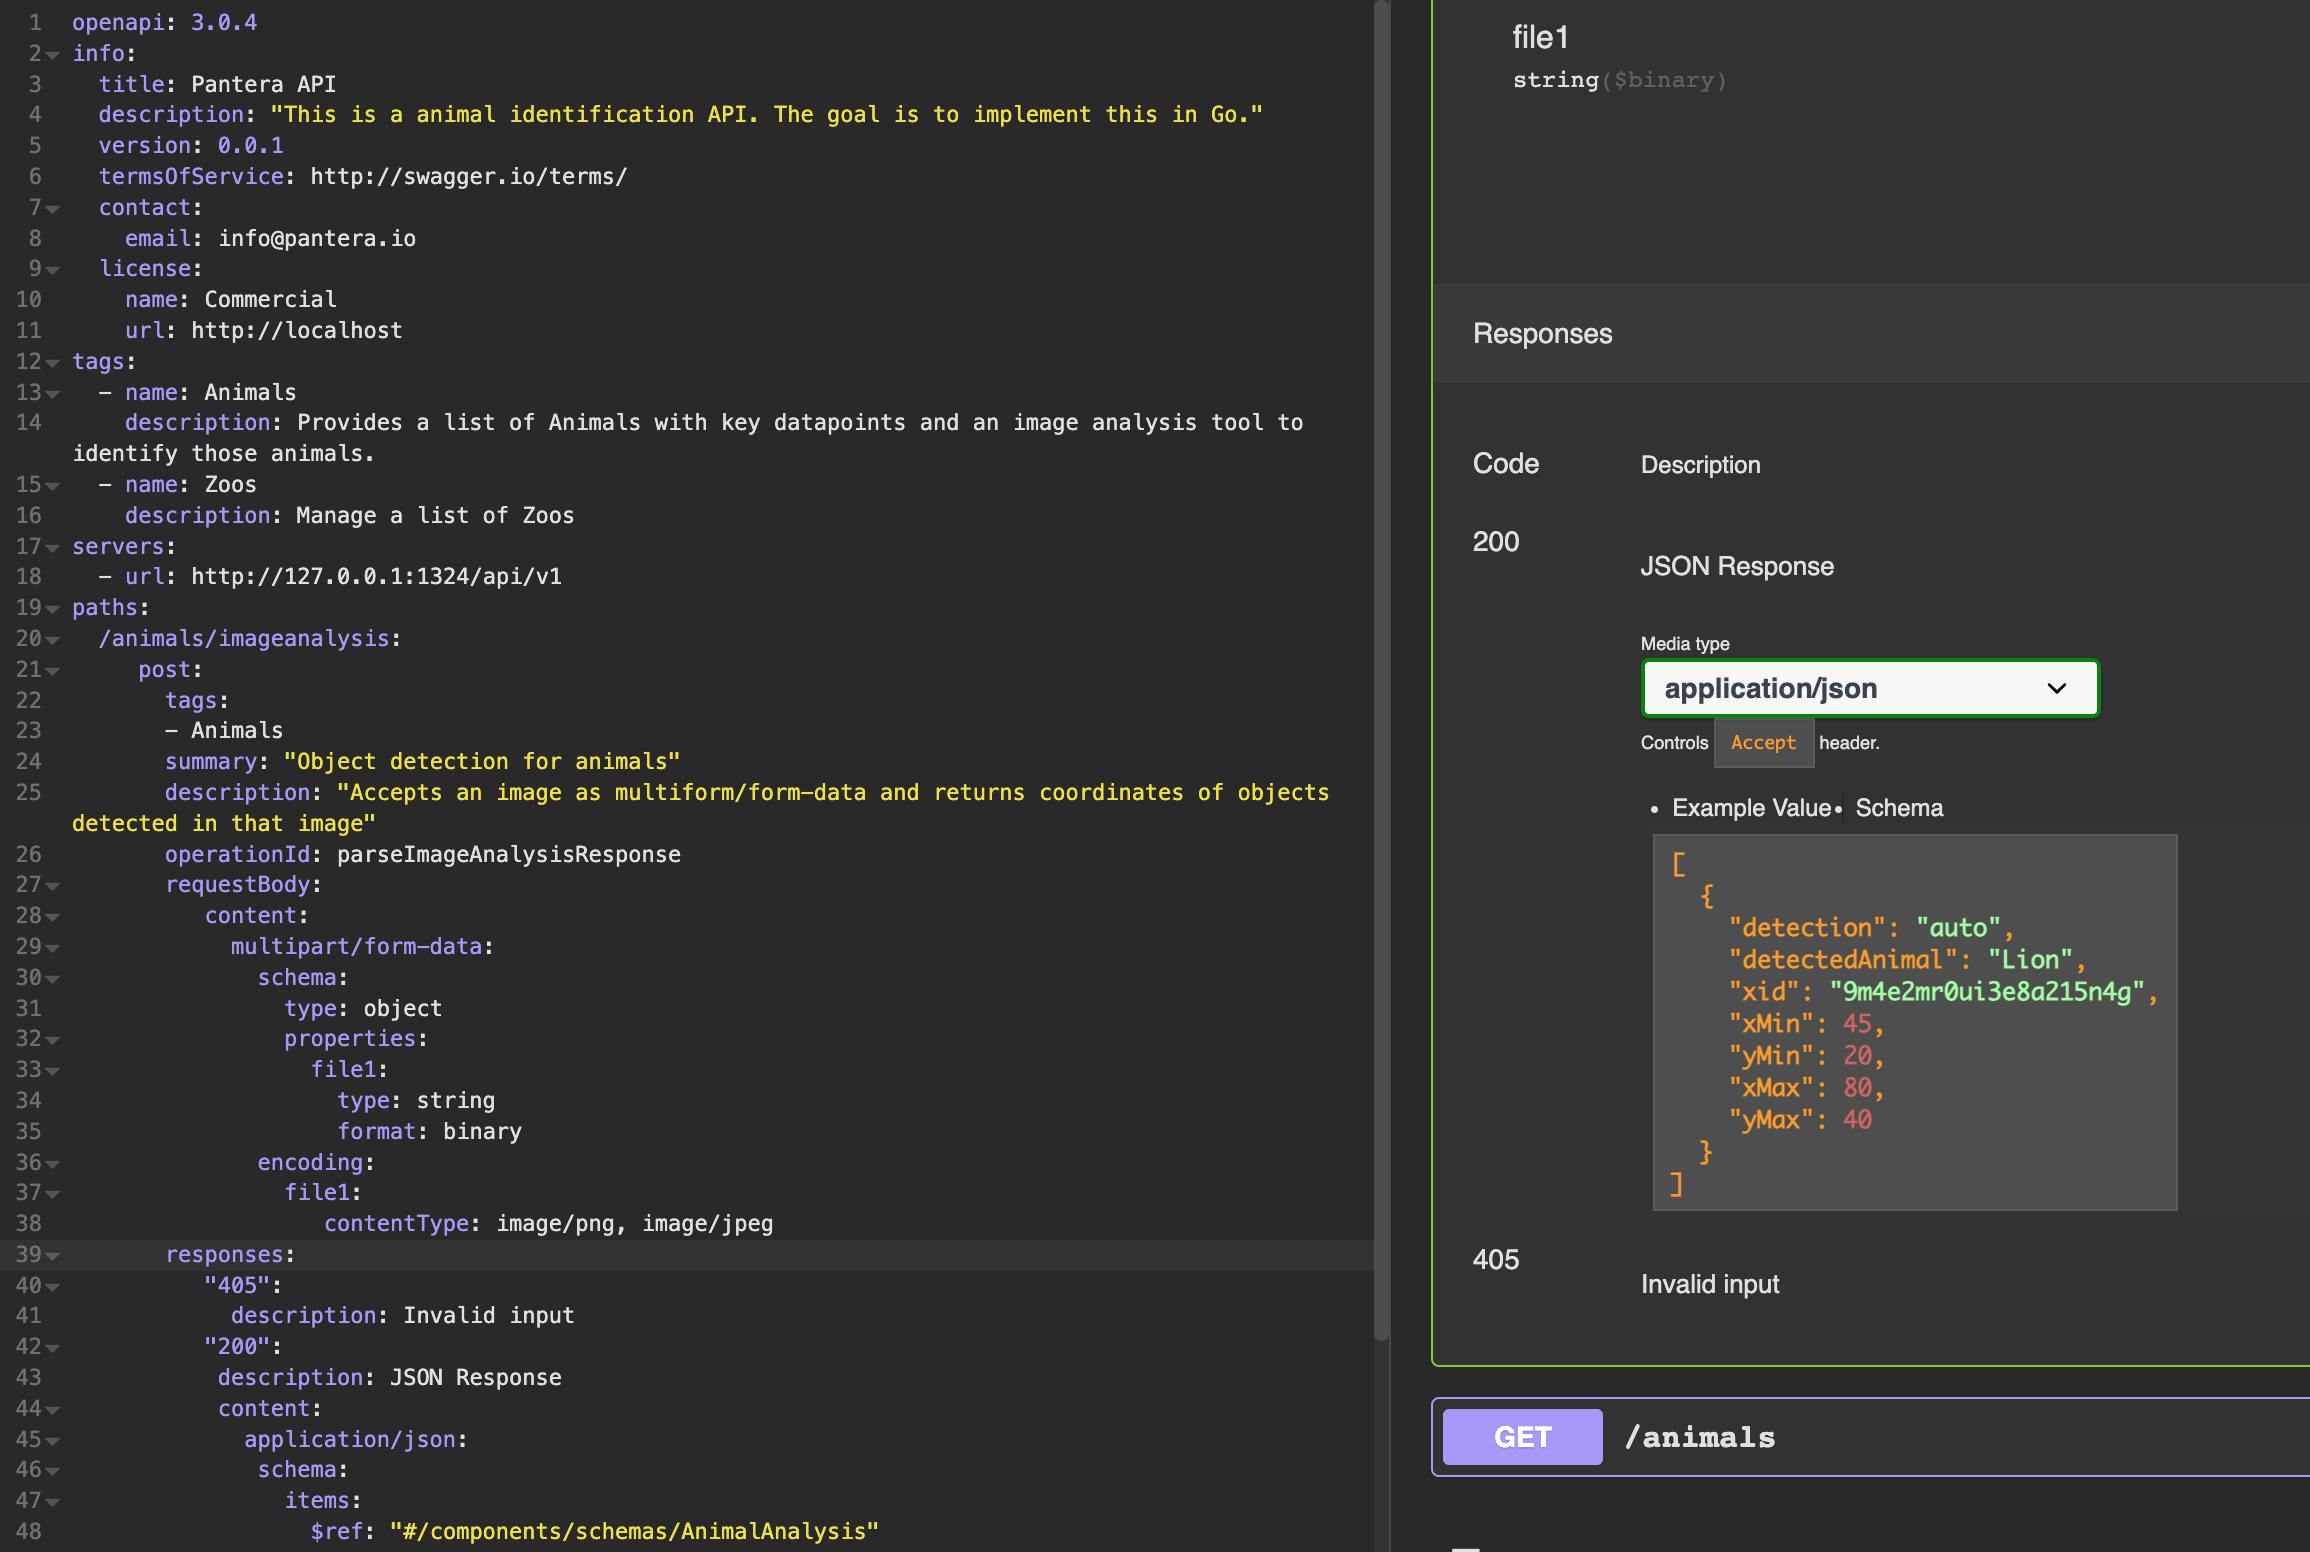
Ok, so first we open the section responses:. Then we decide which codes we want to use, in this case 405 and 200. Then we use description: for a summary on when this response will occur. If it is successful, we return application/json, since this about an API that uses JSON, but could also use XML. If it were a website it would be text/html and an image is image/jpg, you can find more here. Now we define the structure of that JSON response under schema:. This can look like this
examples:
    application/json:
      id: 38
      title: T-Shirt
      image:
         url: images/38.png
for the following JSON
{
    id: 38
    "title": T-Shirt
    "image": {
        url: image/38.png
    }
}
For more involved types that should be defined as structs later, we can refer to a schema and define it in a different section. Since we might expect multiple animals in one image we might obtain an array, this is denoted by using items instead of just adding the reference to the schema.
application/json:
    schema:
      items:
        $ref: '#/components/schemas/AnimalObject'
This will result in an error, since that object isn’t defined yet.
Define a schema for an object
Now we have to define the object we referred to in the last section.
So we give the type a name Bands. It is of type object. Then we define its properties.
Properties also have a name column and a description. This column has again a type which could be number, string or object. The format further specifies the type of string which could be an xid or a date. If a string just has a few possibilities, you can define those as a list in enum. And last we give a sample value under example.
...
components:
   schemas:
     AnimalAnalysis:
      type: object
      properties:
        detection:
           type: string
           enum:
             - auto
             - manual
           description: "Describes if an animal was detected by the object detection algorithm or edited manual by the user."
        detectedAnimal:
          type: string
          example: "Lion"
        xid:
          type: string
          format: xid
          example: "9m4e2mr0ui3e8a215n4g"
        xMin:
          type: number
          format: int64
          example: 45
          description: x-Coordinate of upper left corner.
        yMin:
          type: number
          format: int64
          example: 20
          description: y-Coordinate of upper left corner.
        xMax:
          type: number
          format: int64
          example: 80
          description: x-Coordinate of lower right corner.
        yMax:
          type: number
          format: int64
          example: 40
          description: y-Coordinate of lower right corner.
...
And that’s how we define the response for our API.
A object detection microservice will not deliver the response in a format that is convenient for us for use in the client. We have to adapt the data first. Checkout my post about Relaying a Microservice JSON Response to the Client by Unmarshalling Go Structs on how to implement this in Go.
Finally, the full listing
openapi: 3.0.4
info:
  title: Pantera API
  description: "This is a animal identification API. The goal is to implement this in Go."
  version: 0.0.1
  termsOfService: http://swagger.io/terms/
  contact:
    email: info@pantera.io
  license:
    name: Commercial
    url: http://localhost
tags:
  - name: Animals
    description: Provides a list of Animals with key datapoints and an image analysis tool to identify those animals.
  - name: Zoos
    description: Manage a list of Zoos
servers:
  - url: http://127.0.0.1:1324/api/v1
paths:
  /animals/imageanalysis:
     post:
       tags:
       - Animals
       summary: "Object detection for animals"
       description: "Accepts an image as multiform/form-data and returns coordinates of objects detected in that image"
       operationId: parseImageAnalysisResponse
       requestBody:
          content:
            multipart/form-data:
              schema:
                type: object
                properties:
                  file1:
                    type: string
                    format: binary
              encoding:
                file1:
                   contentType: image/png, image/jpeg
       responses:
          "405":
            description: Invalid input
          "200":
           description: JSON Response
           content:
             application/json:
              schema:
                items:
                  $ref: "#/components/schemas/AnimalAnalysis"
  /animals:
    get:
     tags:
     - Animals
     responses:
       "200":
         description: ""
components:
   schemas:
     AnimalAnalysis:
      type: object
      properties:
        detection:
           type: string
           enum:
             - auto
             - manual
           description: "Describes if an animal was detected by the object detection algorithm or edited manual by the user."
        detectedAnimal:
          type: string
          example: "Lion"
        xid:
          type: string
          format: xid
          example: "9m4e2mr0ui3e8a215n4g"
        xMin:
          type: number
          format: int64
          example: 45
          description: x-Coordinate of upper left corner.
        yMin:
          type: number
          format: int64
          example: 20
          description: y-Coordinate of upper left corner.
        xMax:
          type: number
          format: int64
          example: 80
          description: x-Coordinate of lower right corner.
        yMax:
          type: number
          format: int64
          example: 40
          description: y-Coordinate of lower right corner.
Publish the documentation with Redoc
Redoc.ly is a service for hosting OpenAPI based documentations and make them accessible for third parties. They have a premium hosting service and an open source CLI tool. You can install it with
$ npm i -g redoc-cli
Then copy the YAML file we created above and store it under api.yml.
You can preview the documentation with
$ redocly preview-docs api.yml -p 8080
  🔎  Preview server running at http://127.0.0.1:8080
and open a browser on this URL.
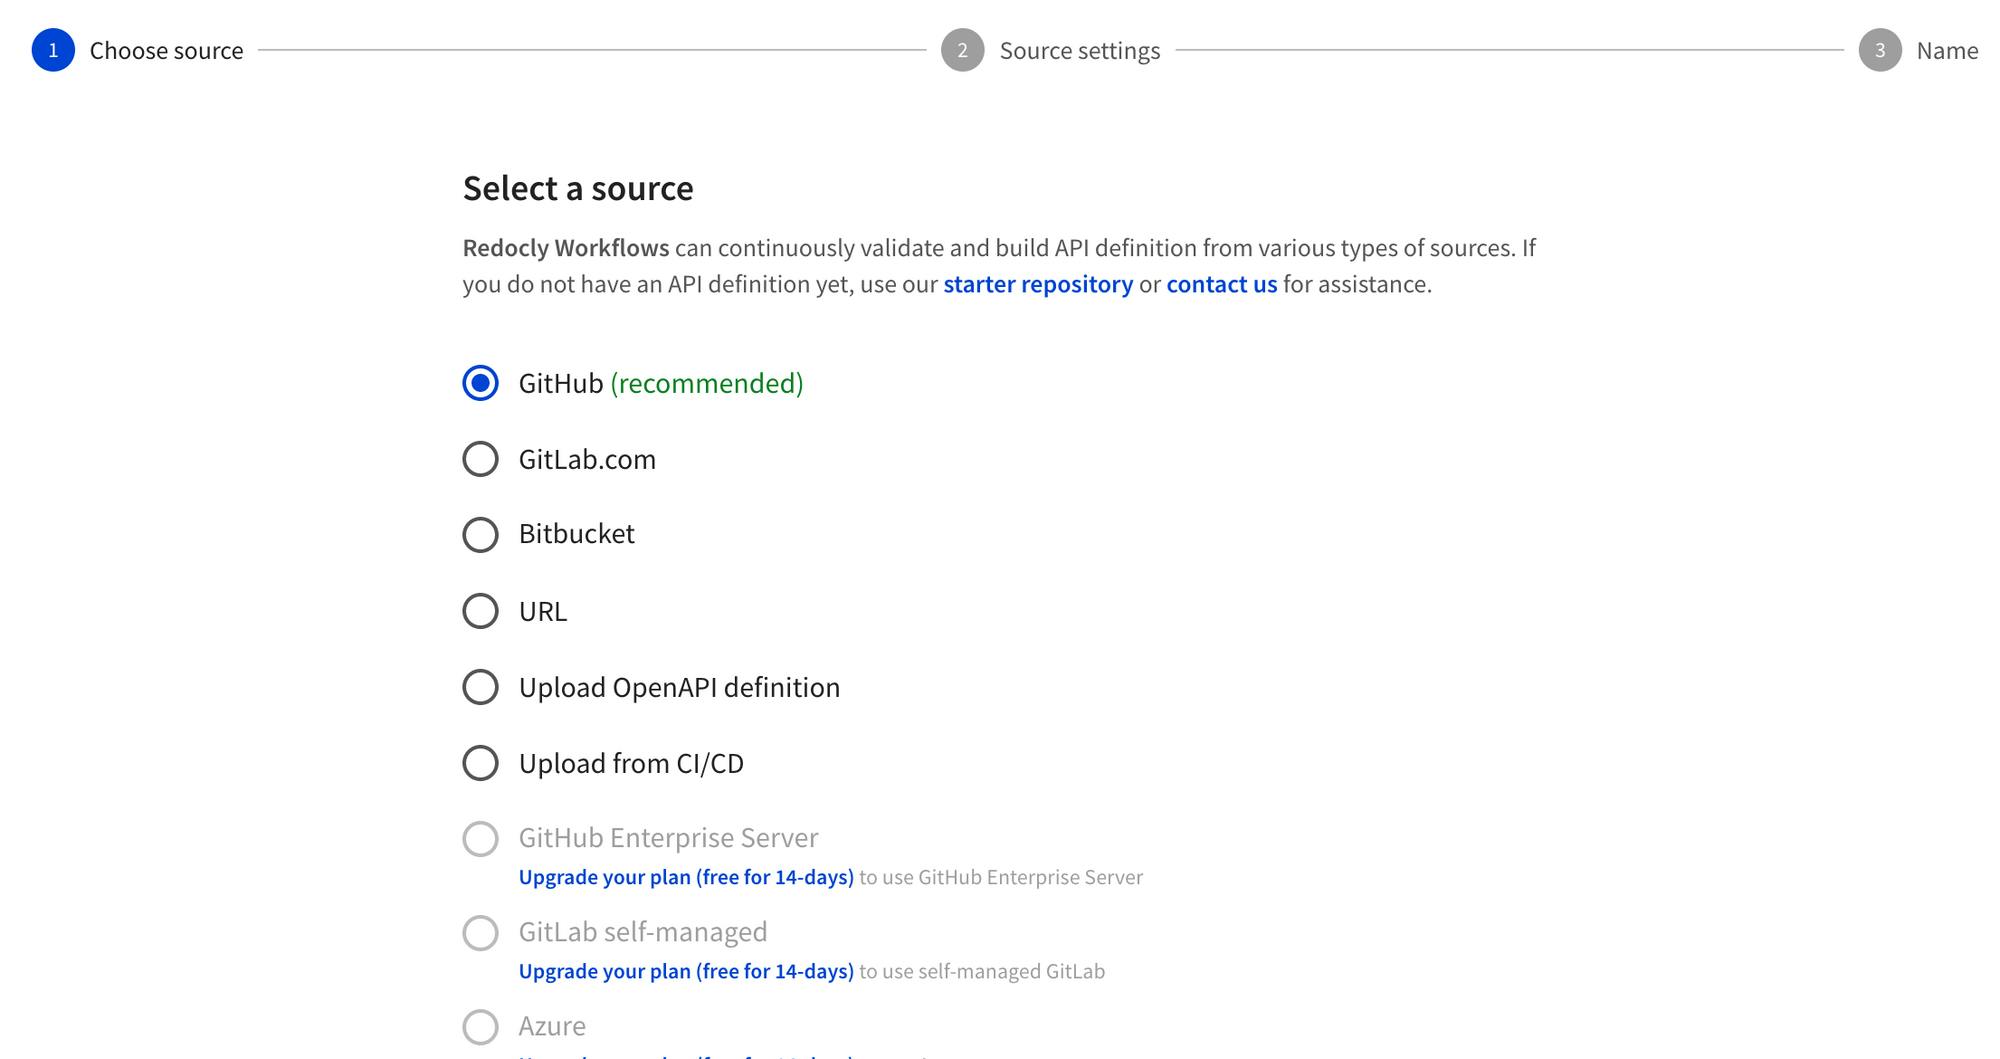
If you upload the file to a GitHub repository you can use Redocly to host your documentation and also keep it updated when you commit changes to your repository.
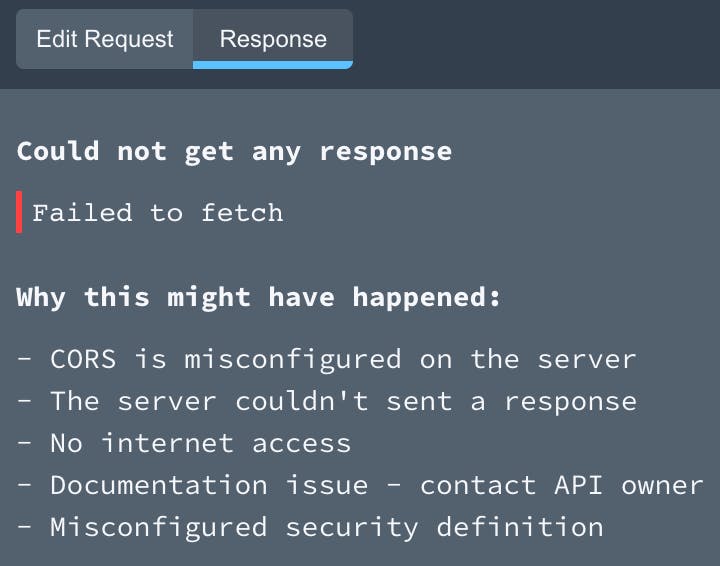
Bonus: Dealing with CORS Error in Go Echo
When you use Insomnia to access the API you can use the try function to make API calls, but not from a browser with Redocly for browser security reasons (CORS).
To avoid this install the echo middleware
$ go get github.com/labstack/echo/v4/middleware
and then in the code add the following line after e := echo.New()
e.Use(middleware.CORS())
Conclusion
Great, I really appreciate staying for so long and if you made it this far that should be enough to design your own APIs. Leave a comment with any questions, suggestions, things not working or words of encouragement.
Links
- Migrating from OpenAPI 3.0.4 to 3.1.0 https://www.openapis.org/blog/2021/02/16/migrating-from-openapi-3-0-to-3-1-0
- A similar tutorial on DigitalOcean https://www.digitalocean.com/community/tutorials/how-to-create-documentation-for-your-rest-api-with-insomnia
- Go Echo CORS settings https://echo.labstack.com/middleware/cors/